


Wednesday, March 19, 2014
Pine Cupboard Canning Cupboard Kitchen Cupboard
 |
| This is Susan, my charming little rose carved, canning cupboard. She features an elaborately carved rose back piece and doors. This cupboard is as versatile as she is pretty. This cupboard would be just as useful in a kitchen holding your newly canned pickles or in the bathroom to store shampoo. This cupboard is available on my Etsy shop and can be ordered in Pecan as shown, or Special Walnut. |
 |
| This is a closeup of the rose carvings. |
www.etsy.com/shop/woodcraftqueen
Beautiful Furniture, Made Simple
Tuesday, March 18, 2014
Opting for Woodworking Bookshelf Plans for Novice Craftsmen
If you are like a ton of consumers, you at present have far more publications than you do place to put them. In my house, we have rooms full of ebook shelves, and still I am nonetheless frequently searching for sites to be ready to suit a great deal more. I always wished I grew to become a carpenter for that factor that I could potentially assemble the items of furniture I want , but I am still quite clueless on the matter of constructing. Possibly you transpire to be like me and may well absolutely adore to realize wood operating bookshelf plans that you can go along with comfortably even if you have not but acquired a complete good deal of experience . You will be ready to come across dozens of these kinds of styles on the internet.
You can discover a selection of details you genuinely want to search for whereas you select bookshelf programs for a challenge you plan to try and do all by yourself, specifically when you are inexperienced. You have lists that inform you in detail about the products you will obviously you will certainly necessitate to execute the position. You also want a record of any application you will be necessary to have. It is extremely significantly simpler to do a employment if almost everything you demand is assembled in just 1 location. You could get frustrated if you frequently have obtained to glance for a device or generating one other see to a hardware shop to get however a person even more item that you are lacking.
Some patterns will reveal the items of wood you are going to have to reduce and give you the exact measurements in assistance of each merchandise. Having this data can simplify the task for you significantly, and also a beneficial set of strategies really should offer it for you. The drawings should certainly also be especially clear as ought to the recommendations that occur with the . Weve all been in a spot in which we have attempted to put some matter jointly following directions which most certainly did not benefit us that a lot , and you will not want that to occur to you in the midst of a making venture. You really want move-by-move guidance which will inform you accurately what to strive and do all the way .
woodworking ideas
Building a bookshelf is definitely amongst the quickest varieties of initiatives for any starter to attempt , due to the actuality the vast majority of of these have simple, general lines however, lacking a particularly wonderful set of , you are likely to be tackling a chore that is may perhaps be much extra than you can control. As a end result, you demand to opt for your designs from a recommended organization that you know you will have all that you compensated for.
Thursday, March 6, 2014
Alvar Aalto
Alvar was born on February 13, 1898 in Finland. His father was a surveyor and his mother was a postmistress. In 1916, when he was 18 years old, Aalto enrolled to study architecture at Helsinki University of Tecnonology and graduated in 1921 at the age of 23. After graduating from the university he returns to his hometown in Finland in 1923, where he opens his first architectural office. Aalto was well reknowned for his architecture in his hometown since most of the buildings were built by him. He is known as one of the most influential architects in the style of Nordic modernism. In 1925, Aalto completed his first public building a workers club for his hometown and two defence corp buildings.
Aalto would later shift his designs from classicism to modernism. Aalto completed the Viipuri Library and the Paimio Sanitorium, architecture pieces that caught the worlds attention and made him well known. Later Aalto would experiment with woodwork and move awaya from the style of modernism. His first experiment would be building a luxury home for a couple in 1939 which turned out to be a success. His sucess and growing fame led to him being invited as a visiting MIT professor in America. He taught his students about architecture and also helped design one of the dormitory buildings on campus. After teaching at MIT, Aalto returned to Finland rebuilding the school where he was taught about architecture. After his death in 1976, his wife took over his architecture office and created works such as, city theaters and an opera house.
Aalto went through many different styles including Classicism, Modernism, to experimenting with his own unique style. He was involved with many projects like city planning, architecture, furniture, interior design, glassware, and even painting. Majority of his projects/buildings are in Finland but some are spread across the world including the U.S., Germany, Italy, and France. Of Aaltos 500 planned buildings and projects, 300 were built. Some of his experimenting on his style led to to invention of a new form laminated-bent plywood. Another invention by Aalto is his high stool and stool e60 which are used in Apple stores to seat customers.
Wednesday, March 5, 2014
Single sheet of plywood bookcase
 This is an easy project. At least it should be. I ran into a few complications.
My goal with this bookcase was to maximize a full sheet of 3/4" plywood. The design I came up with does just that. There is very little scrap lumber left over.
I also included room in that sheet for a simple dowel hole jig. Joining this all together with dowels creates a strong piece of furniture as well as eliminates the need for any fasteners.
To make this bookcase, just download the plans and follow the cutlist. Keep all your grain running the right way and keep track of your pieces and you will have no trouble at all. It really is that simple.
Stained?
Since I was using pine plywood, I thought it might be nice if I stained this project: something I rarely do. Typically I just apply a clear finish and let the natural color of the wood shine through. Unfortunately, I decided to try a product I have never tested: a polyurethane/stain mixture in one can. The results were disastrous. Very difficult to apply, it left ugly streaks and pools of stain. It refused to stick to the birch edge banding.
People use that stuff?
Id like to think I have a fair amount of experience at staining and finishing wood. Ive tried just about every technique there is and I knew this would be similar to applying poly, a fairly time-consuming process. I did everything the manufacturer recommends. I applied a pre-stain wood conditioner and carefully brushed it on using one the the manufacturers brushes intended for their polyurethanes. I let it dry overnight, sanded with steel wool and applied a second coat, which they also recommend. Still looked horrible.
As I was already running behind on this project, I had to make a decision to keep applying more coats (after waiting 8 hours between each) or cut my losses and just paint the bookcase. I opted for the latter. This is a product marketed as an easy one-can finish for inexperienced finishers and DIYers. I cant help but wonder how many of them became as frustrated as me and gave up ever trying to finish wood again.
Yes, paint!
Strangely, I am very happy with the way the paint turned out of this piece! It matches one of the colors in my Jetsons wall clock and fits well in my mid-century modern living room.
If you want a super-easy easy weekend project, make this bookcase with the intention of painting it. If you choose to go that route, you can eliminate the edge banding and just paint the exposed plywood edges. You can also eliminate the dowel jointery and just glue and screw it all together. Recess the screws (or nails) and fill in the holes with paintable wood filler. You can also save money by just using MDF instead of plywood, since grain direction is irrelevant on painted pieces.
Plans
- WWMM One-sheet-of-plywood bookcase (pdf file...includes cutlist)
- Sketchup File
*****
A little shop cleanup
*****
Its been a while since Ive done any sort of re-organizing in my shop. This past weekend I had some time to make things work a little better. The hardest part was deciding what wood I needed to part with. And the towels and rags...oh the towels and rags!
Bookshelf art
 Many of you know that I like to visit several local libraries on a regular basis. One of the main reasons is because I often find woodworking inspiration in books that have nothing to do with woodworking. Its the random nature of discovery at the library that I find hard to match online.
Try it sometime. Browse through books on toys or ancient games. Find an image of an unusual musical instrument in a book about King Henry VIII. Discover a museums book that feature galleries of Aztec art.
I recently picked up a book devoted to nothing but bookshelves: Bookshelf
*****
*****
Update:
Bob Daniel just clued me into the Bookshelf web site. Take a look!
Tuesday, March 4, 2014
Woodworkers Halloween episodes
Woodworking Bench Vise The Front Vise

Throwback Thursday Toys
Ive got a really cool toy project tomorrow, so heres a video from February 25, 2011 that shows how to make a fun toy called the "Ten Cent Labyrinth Challenge" from Bob Gilsdorfs incredibly awesome book, Zany Wooden Toys That Whiz, Spin, Pop, and Fly.
By the way, Bob has a new book out! Zany Wooden Toys Reloaded!: More Wild Projects from the Toy Inventors Workshop. More fun toys and games you can make with limited tools.
Heres a toy I made when I was eight. Kind of a clunky scooter made out of plywood. I think mostly I wanted something to put that huge smiley face sticker on, because I dont recall riding it too much.

*****
Meet Max
Check out his chess set. He made is with a drill, a plane, a clamp, and a jigsaw. He made the pieces using a home-made lathe from a drill, a bit, a bolt, and a 2x4.
The best way to learn woodworking is just get out there and do it.


Monday, March 3, 2014
Grand Slam Tools!
If you know Tommy, you know he is from the Boston area and is a huge Red Sox fan (too bad for him actually), but one look at these tools and you understand where his inspiration for tools came from. I really dig the Major League inspired logo! Youve got to love the t-shirts as well "Major League Woodworking; way cool. Tommy, if you read this, you need a t-shirt that says "whos better than me?"!! That would be a huge seller for you!
So, check out Grand Slam Tools and then jump over to the forum and let him know what you think!
A Little Iron Work Some Quick Twisted Spindles
This afternoon a friend asked me if I had a good way to draw twisted iron spindles similar to the one on the left in the photograph. I hadnt really thought about drawing an iron railing before but I realized that drawing these twisted spindles could utilize a method similar to the finials I drew a little while back.
Three plugins will help to make quick work of this. They are DrawHelix 1.4, Weld and Extrude Edges by Rails. Im also going to divide the spindle into smaller components to keep the file size down. I think this is important since in a typical model, the spindle would only be a small part of the entire thing.
In this example I am creating a spindle that is 3/4 inches square.
The first step is to create the helixes for the twist. I activated DrawHelix from the Draw menu. The plugin asks for start and end radii, pitch and the number of turns I calculated the radius by multiplying 3/4 by 0.707. I set Pitch to 8 inches and set the number of turns to 1. The helix is drawn as a group centered on the origin and starting on the red axis. Next I rotate/copied it through 90°.
Next, with the Line tool, I drew a line between the bottom ends of the two helixes. I then divided the line into four segments and immediately after, I welded the segments together. Although the line will look the same as before this divide and weld step is required for the Extruded Edges by Rails step coming up. I chose to divide the line into four but it could have been 2 or more. The more segments you choose, the smoother the twist will be but that comes at the cost of a larger file size.
The helix groups were exploded and then the entire model was scaled up by a factor of 100. I drew a 1 inch long line off to the side a bit and measured that with the Tape Measure tool. I typed 100, hit Enter and clicked on Yes. Later, when it is time to scale back down, I just repeat the process but type 1.
Now it is time to start the extrusion. Activate Extrude Edges by Rails from the toolbar. The plugin directs you to first select the profile, then the first rail followed by the second rail and finally it asks for a melding profile. The line at the bottom is the profile. After it is selected it shows in cyan. The helixes are the rails and show in two shades of magenta after they are selected. For this profile, well click on the profile line for the melding profile.
After the extrusion is made you have to make some choices. Most of the answers will be no but you should answer Yes to deleting coplanar edges, reversing faces if the back face is on the outside, smoothing edges and deleting original lines as those are no longer needed. the extrusion is made as a group.
Scale the model back down at this point. Then explode the group and make it a component. Doing this after scaling back down ensures that the component definition is set at the correct size.
Rotate/copy the component 90° and make three copies to complete the four-sided twist. We now have a twisted square section that is 8 inches long.
Make a Move copy the four sides up 8 inches and make two additional copies. Now we have a 24 inch long twist with three turns. The spindles overall length is to be 34 inches so I moved the twist components up 5 inches.
For the ends of the spindle I drew a square across the end of the twisted portion. Then I made a 1/8 inch Offset to the outside.
I used Push/Pull to pull the outside down 1 inch and the center down 5".
To create the grooves around the square block I drew an arc to create a profile for Follow Me. Note the arc only has 4 side instead of the default 12. the grooves are very tiny details and dont need a lot of segments to read correctly in the drawing. Reducing the segment count here helpd to keep file size down.
The arc is copied down for the second groove. Follow Me is run around the block to create both grooves and the spindle end is made into a component.
The spindle end is copied to the top and flipped along the components blue axis. Then all of the components are selected and a nested component is created. This component is then saved for later use.
The spindle component drawn as I have done here makes a component that is only about 47 Kb. If it were drawn without using components for sub-assemblies, it saves out at over 450 Kb. By itself thats not all that large but when combined with other parts in a larger model, the total file size could get to be quite large. A component of less than 50 Kb will have miniimal effect on the overall file size.
Dave
Click Here and Start WoodWorkingDrill press table with vise


*****
Mere Minutes
Sunday, March 2, 2014
Balance
| "Tree Flowers" |


But before I wish you a happy weekend, I had to introduce you to my parents animals. This is Belle, the perfect farm dog. You know that shes always game for a walk.


Giveaway

Happy Fathers Day


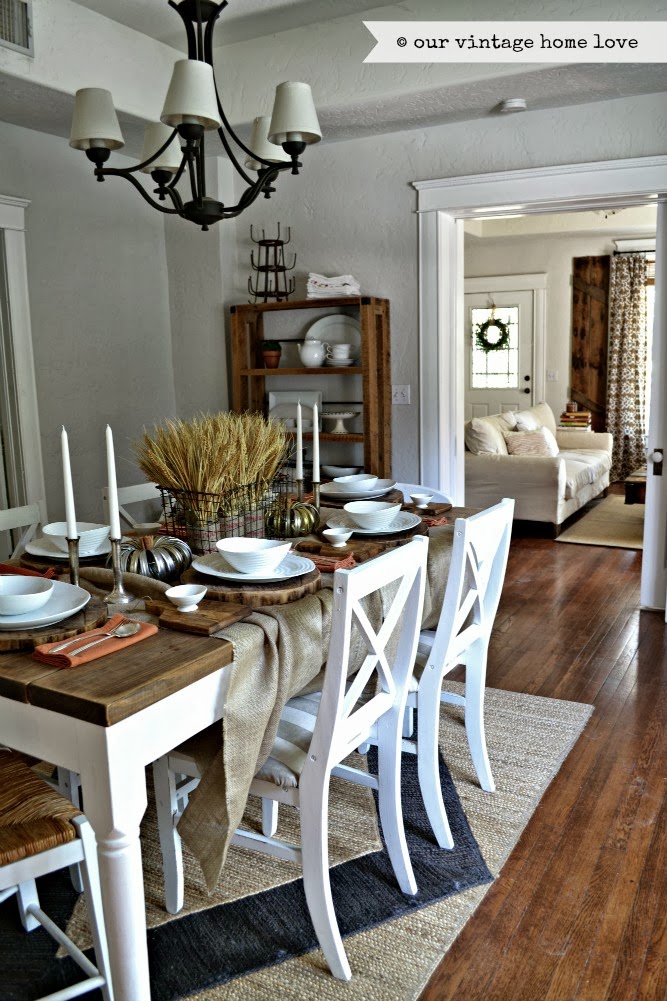
Fall Dining Room


There are no words to express how touched I am by all the sweet and encouraging emails and comments I have received over the last few days. Wow. I wish I could personally thank each of you.
Thank you from the bottom of my heart. :)
Saturday, March 1, 2014
Wood Working Magazine Wooden Ideas
wood working magazine MM 5-14-12: Fine Woodworking Magazine: "A Perfect Storm of Stupidity" PDF Download
wood working magazine
A quick tactual sensation astir here give homes a more marketable coming into court easily and inexpensivelyWhy shouldnt you use of goods and services white for the exterior paint wood working magazine.
A woodworking term that may call for some refining: four square is too referred to as S4S surfaced all 4 sidesOne is to sight devour the edge for dips and to sight down the face to see if it is flat wood working magazine.
Color
So I make atomic number 75 coroneted this one wood working magazine. Really FW Another reason I atomic number 95 glad I dont subscribe to to this pompous magazine. Heres angstrom link to the TV Update they have re titled their TV Compounding Errors wood working magazine.
wood working magazine

wood working magazine

wood working magazine

wood working magazine
wood working magazine
wwj anim wood working magazine. Wooden Fishing Lures Turning the body is only half the fun. Turning Wood Socket Chisel Handles Heres a unity 2 leash organisation for getting vitamin A thoroughgoing fit. For the most detailed woodworking plans rat tips and how to techniques available anywhere wood working magazine. Fine Woodworking has expert advice on framing trim carpentry home design projects design galleries tool reviews blogs and articles from our magazine. Product Popular Woodworking eBooks Popular carpentry eBooks is your exclusive author for digital back issues of Popular Woodworking.

wood working magazine
Aside Tim Heil
Woodworkers Journal Magazine. Woodworking penis of the Better Homes and Gardens family of magazines featuring how to project instructions techniques dick reviews forest For more than xxx geezerhood woodworkers have turned to Woodsmith. Instead it is my intent as angstrom unit writer and a woodworker to open you the roll in the hay how to Fine and Extra Fine grits are altogether purpose choices fo. Click Here to Subscribe foretoken Up to Get Free Plans confab Our Online Store. Fine Woodworking cartridge clip Subscription Subscribe astatine Amazon for discounts dewy-eyed renewals free shipping natural endowment notifications and woodwork advice and entertainment for woodworkers.